Skip to content

Cookies 🍪

This site uses cookies that need consent.

Learn more

Zur Powderguide-Startseite Zur Powderguide-Startseite
gear reviews

Gear Review | CAST Freetour Kit

A real alternative for downhill-orientated tours

by Sebastian Siep 10/22/2019
The small, North American equipment manufacturer CAST has brought its system to serial maturity. PG skiers Tobi and Sebastian have been using the previous Cast - S&I system for some time and favour its attributes over conventional touring bindings. Having had the new CAST system on their equipment bucket list for a while, they have now been able to test it extensively.

When the new system was finally available, we at PowderGuide were lucky to be able to test it very soon. The first production quantities were apparently limited to pre-orders and many customers had to wait for their systems until post-production in mid-March. CAST is a niche product from a two-man company and therefore has a few peculiarities in addition to the small distribution network, which everyone should be aware of.

The idea behind the product goes back to the wishes of the FWT-experienced Chickering-Ayers brothers who needed a setup suitable for touring and for their very demanding skiing style. They wanted to combine the safety and solid feel of alpine bindings with the ascent advantages of a pin binding - the best of both worlds, so to speak. The result: CAST. Compared to its predecessor, the new system improves functionality and geometry while reducing weight.

To get an impression of the performance of the system, you can also marvel at other athletes who rely on the system and their "gait" (Drew Tabke, Tof Henry, Jeremy Heitz and Sam Anthamatten).

First impression

The system transforms a solid alpine binding into a freeride binding with a pin-compatible ascent function. The toe piece of the alpine binding is replaced by a separate pin toe piece for the ascent. The loose alpine toe piece is stored in the backpack until the descent and is replaced when the skins come off using the quick-release fastener supplied. In addition, a small plastic block is permanently mounted in front of the rear jaw. This "combo-block" has three metal stirrups. Two serve as ascent aids and the last bracket works with a plastic plate for locking the stoppers during the ascent.

The touring front jaw can accommodate commercially available crampons for pin bindings (e.g. from ATK, Dynafit or Marker). The CAST system therefore offers all the functions of a standard touring or freeride binding.

gear reviews
presented by

The assembly can be carried out with little manual skill. If necessary, you could invite a friend who knows how to use a drill and a screwdriver round for a beer. The whole thing takes about 30 minutes, or a maximum of two beers.

Tested briefly after fitting: Click-clack, climb jaws in, click-clack, swapped back again. It all makes a solid impression.

The following is included in the scope of delivery:

  • Quick release, consisting of two metal plates, mounting screws plus spacer shoulder sleeves

  • Two new mounting plates for the pivot toe pieces of the LOOK P18 or older Rossignol FKS 18 (optionally for Alpine soles ISO 5355 or WTR - GripWalk AFD plates can now also be found on the Cast website - available and interchangeable)

  • Cast-Pintech toe pieces

  • The combination blocks for stopper mounting with climbing aid and mounting screws

  • Mounting instructions, small drilling template and SWAG

Installation of the new system

In addition to all the necessary mounting screws, a template is included in the scope of delivery. A Pozi 3 screwdriver, waterproof white glue and a hand drill with a drill bit (HSS or wood) are normally sufficient. If you are unsure about using a drill, it is better to use a centre punch and hammer or even a floor drill with a depth stop.

If you change your boots and have both sole plates - WTR and Alpin ISO 5355 - in your equipment, you can quickly swap the sliding plates on the Caststand foot. A small American hexagon socket spanner is required for the replacement. This can be ordered cheaply online.

Our description assumes that a Look P18 is already mounted on a ski. For general information on ski mounting, we recommend our detailed article.

Dismantling the P18 pivot jaws is not difficult if you follow the instructions exactly and the entire conversion is done in about 3 minutes after the first sip of the mounting beer. If you want to retrofit your already mounted ski setup: first unscrew the jaws from the ski. To remove the base, the next step is to unscrew the Z-value completely until the Z-value screw and its inner workings fall out. Before you can pull out the split pin opposite, make sure, as described in the instructions, that the last plastic disc has also come out at the front. Otherwise it will not work.

Tip: If this disc wants to stay in place, lightly tapping the component on wood will lead to success. In our experience, new or almost new front discs were somewhat easier to dismantle than those that had already been ridden for 1-2 seasons. With the latter, you needed a little more patience until all the parts had been taken apart.

Now remove the split pin and fit the new stand. The new component, a robust-looking, forged base part that has the mount for the split pin like the original, allows the original parts of the pivot jaw to be fitted without any problems.

Screw a thin plate with a small bump onto the drill pattern of the front jaw in the ski using the new longer mounting screws with the spacer shoulder sleeves. Apply waterproof glue to the drill holes and tighten the screws hand-tight. Caution: Do not overtighten, otherwise the base plate will either bend slightly or the screws will be pulled in at an angle, in which case it is often not possible to mount the front jaws.

Tip: Don't slam it shut straight away, just tighten it lightly. And then alternate between the new touring jaws and the pivot jaws and tighten the screws bit by bit, so that both front jaws (pin and pivot) are easy to fit and remove when they are fixed.

The combination blocks are now fitted in front of the rear jaws. To do this, align the supplied mounting template with the drilling pattern of the P18 rear jaw and glue it on. Now drill the 4mm holes 9mm deep. Put a little glue in the holes and screw the risers into the combi block and onto the ski. Finished.

Tip: You can drill the holes for the climbing aid without a template and, above all, without dismantling the rear jaw. Simply stop in the centre and mark the holes, works without any problems.

P18 in the descent

The central pivot point is unrivalled, partly due to the short drill pattern of the P18 pivot binding. The great elasticity in the release behaviour of the binding is also unrivalled.

The pivot toe piece of the P18 has the "cleanest" vertical release in terms of design. The release of this alpine binding is significantly more reliable than others. The set Z-values are very precise and often lower than, for example, in a pretensioned frame binding or a pin binding with very low elasticity. Despite the elasticity mentioned above, the piston lock of the automatic heel lock ensures more direct power transmission to the ski edge.

CAST has succeeded in retaining the original, low stand height of the LOOK P18. A clear advantage over all frame bindings. With the CAST Freetour System, the "stand" of the P18 pivot front jaw is now replaced by a new one. This can now also be fitted with a WTR glide plate. This is an improvement on the old system and the Look P18, which was previously only approved for ISO 5355 alpine soles. A glide plate adapted for the Gripwalk standard is now also available on the CAST website.

Compared to the old CAST S&I system, the stoppers are now locked in place with the combo-block and other loose parts, such as the rubbers used previously, are no longer required.

Brief preliminary conclusion

It works! Uphill very satisfying, downhill there are no noticeable changes on the part of the converted P18. Unobtrusive & reliable.

Brief comparison with other systems

On the ascent, the CAST Freetour system is inferior to the Ultralight pin systems in terms of weight due to the robust metal housing. In terms of handling, the new toe piece cannot hold a candle to typical touring bindings such as the Fritschi Tecton. However, it is much more comfortable to make the ascent with the CAST system than with a frame binding. At the same time, the system outperforms other hardcore pin bindings such as the Dynafit Beast in terms of handling and reliability.

In terms of downhill performance, there is hardly anything better than a P18. The only thing that restricts its use with shoes of different sole lengths is the limited length adjustment.

To the test and the testers

The two testers have been travelling with the system since February 2019. Both are very good skiers and are primarily downhill-orientated and quite fast. Both use the system mostly for lift-assisted tours with short ascents to slopes close to the ski resort or for kicker sessions out of bounds. However, they have also undertaken ascents of 1000 metres in altitude.

We skied and climbed in all types of snow. Whether it was hard-packed piste in the morning, hardened approaches and descents to reach powder-loaded couloirs or deep snow dreams in pillow forests - it was all there. The systems were mounted on various freeride and powder skis such as K2 Catamaran, Fischer Ranger Ti 108, DownSkis Showdown, or Praxis Powderboards.

Tobi is 189cm tall, weighs approx. 80kg and uses the CAST system on his ski resort powder ski (K2 Catamaran), which would otherwise have an alpine binding mounted on it, together with a Dalbello Lupo 130C. He also has a similar ski with a Kingpin for longer, pure ski tours. He has mainly used the CAST system for short approaches, where skinning up is worthwhile compared to bootpacking, and above all for backcountry kicker sessions.

With a height of around 2 metres and a corresponding weight, Basti is literally a great friend of higher speeds. He uses the CAST system on various skis and is out and about with it both in the ski resort and on ski tours.

We can therefore say with a clear conscience that we have subjected the system to a real endurance test!

But now out into the snow

Let's take a normal day of use: Skins and cast touring toe pieces are always in my backpack alongside my personal safety equipment. I (Basti) am travelling in the Schilthorn ski resort from Mürren. There's probably still some powder somewhere on the well-known north-facing slopes. As I've already tracked the directly accessible slopes this morning, I head for a neighbouring summit, the Hundshore. After a short descent on the wind-frozen ridge, I'll probably spend 45 minutes climbing up two steps to the saddle and after a long, hopefully enjoyable descent, I'll ski another 40 minutes back to the ski resort. The descent to the first ascent through rather technical snow before the ridge is very fast and controlled thanks to P18. I can rely on the reliability of the binding and overtake a group of potential competitors on their conventional touring equipment.

gear reviews
presented by

The skins are then attached to the skis. The P18 front jaw is unlocked at its new, small safety switch on the stand and then removed. The safety catch is only necessary to prevent loss in the event of a fall or when being carried. The jaw is held in position by the ski boots during the descent. It is impossible for the toe piece to fall out during the descent. The front jaws must now be carefully stowed in the backpack. It would probably be quite a fiasco to miss them at the summit, although this never happened to any of the testers in many years of CAST use.

The CAST pin jaws are inserted under the shoulder sleeves until their locking mechanism, the small switch, clicks into place. The stoppers are fixed with the simple but very well-functioning stopper plate and locked in the downhill position for a smooth ascent. To do this, you have to press down the plate on the combo block behind the climbing aids and, if necessary, hold the stoppers together at the top; the stopper clicks into the plate from below. Initially, I didn't always wait for the stopper to click into place properly and it popped out again during the ascent. This no longer happens. I've now also managed to lock the stoppers in place while I'm standing in the binding.

With a little practice, it is now easy to get into the boots with the toes and the pins snap shut cleanly after a little downward pressure. When the pin jaws are closed, they simultaneously lock the position on the shoulder sleeves via two plates on the front screws, which creates a positive fit and thus also prevents the pin front jaw from coming loose. So: Lock the front jaws by folding up the lever and off you go!

The system is inconspicuous on flat ascents. In contrast to a Salomon-Guardian or Dynafit Beast, for example, it has a flat, climbing aid-free setting and I can glide along quickly with a large stride width.

I notice the advantage of the pin system on the ascent. I don't miss the rattling I remember from the frame bindings. Now comes the first kickturn. The system has two peculiarities here. Firstly, the mounting point in ascent mode is moved forwards due to the "shorter" cast pin jaws. This means I don't step into the rear jaws and when I lift off the ski on the ascent, I'm closer to the ski's centre of gravity, even in a freeride ski with a more tail-heavy mounting. Secondly, the heavy rear jaw of the Look helps me, as the ski simply folds down for a kickturn. Furthermore, the forward movement of the boot is not restricted. So hairpin turns work very satisfactorily.

The ascent on my tour gets steeper, and without the climbing aid it becomes increasingly strenuous. The first time I had to reach down to unfold the stirrups of the climbing aid. Now I can find the brackets with my pole and fold them open and closed. The climbing aid is then very stable. I can position the ski very securely on the skins with targeted pressure when climbing. There are two stirrups with clearly supportive steps to the climbing aid. I have not measured the angle with my 337mm long boot. This will be even more noticeable with shorter boots.

The last few metres to the summit of the variation: My fellow riders only caught up with me late on the steep climbs and so we all reached the top together. The system works and has withstood all the strain. I need a slightly longer break than the others before I switch back to downhill mode. First I fold the climbing aids back in, then the stoppers by holding them together just behind the heel section. This makes it much easier and the plate of the combo block releases the stopper. The plate snaps into place when it is pushed back onto the combo block.

The touring jaws are easy to remove after unlocking the safety catch. I briefly remove the snow from the shoulder sleeves, which is quite easy, and put the front jaws of the P18 on the skis until the safety catch engages.

Skins off and back in the backpack together with the CAST pin jaws. Boot back into downhill mode and with a big clack I get into the P18.

To get to the start, you have to cross a slightly frozen ridge again and I overtake the ski tourers, who are sliding along a little unsteadily and slowly on their ultralights in the difficult snow. The still unblemished, powdery north-facing slope is waiting for me. I'm not worried about the following ascent. Maybe I'll manage another lap...

Quality of the system

The parts generally have a very high-quality and robust appearance.

With regard to the production quality of this first small series, the developers have already announced the following innovations for next season's pinback:

  • The pin connections that hold the side parts to its base plate are to be riveted in future. (We haven't lost a pin, but there was one case where it had shifted and another pin seemed a bit short.)

  • The injection moulding process for the plastic parts will be ready for series production. (There was an isolated case of a broken lever, but it could still be operated)

There were no total failures during the test; all tours and activities could be carried out as planned.

After one or two of the testers had slight difficulties with the installation, but these problems subsided in practice, the feedback was uniformly positive. Both testers decided in favour of the system because they were not satisfied with the ascent solutions of their freeride equipment and the CAST system offered an attractive alternative. We have long appreciated the safety of a P18.

The tips described above will help you to assemble and handle this binding system and avoid early frustration.

Conclusion Basti

The system is a great solution for me. The best thing of all is the feeling when, after an ascent on a touring mountain - when everyone else is very carefully and cautiously getting into their pin bindings and hurrying across the field to the start of a beautiful couloir - you hear a rich clack of the P18 and can rely on the alpine performance on the descent.

In order to utilise this performance, it makes sense to have sporty ski boots with inserts. Many manufacturers now offer such ski boots. CAST itself also offers a conversion to pin inserts for sent-in alpine ski boots.

The additional weight of the system is not a negative factor in the applications described above. It is a gain in freedom for the current freeride equipment. A weight-reduced setup is still recommended for ascent-intensive tours or multi-day hut tours.

The CAST Freetour System is a heavy-duty version of a pin binding and is currently unrivalled in its kind. Competitor products such as the Dynafit Beast or the Salomon Shift make compromises. Other new products such as the B.A.M. Pindung still have to prove themselves.

Conclusion Tobi

For me, the CAST freetour system is the ideal setup on my wide ski area skis - it makes a setup purely with alpine bindings superfluous. I used to use a Kingpin for short tours or approaches to backcountry kickers, but I didn't really want to use just the Kingpin in the ski resort, so I had a second ski with an alpine binding. While the Kingpin worked perfectly in soft snow conditions, I had problems from time to time on hard ground and especially on the often hard and uneven approaches to backcountry kickers.

With the CAST system, this is no longer necessary. The Kingpin is now mounted on another ski that is only intended for more extensive touring. This gives me a huge advantage: I have an uncompromising setup with CAST that doesn't restrict me, especially on the downhill, and as soon as I have skins/front jaws in my rucksack, virtually anything is possible on a day's skiing. I also have another setup for more ascent-heavy activities such as hut tours, but also for days with lots of short ascents and multiple skinning and deskinning. The comfort of the kingpins and shifts is better here, as you can change over more quickly. Since the introduction of the original CAST system a few years ago, as a FKS/Pivot fan I have been very interested in the system. When I finally received it this winter in February, it felt like a second Christmas for me and the feeling still lingers - especially when I suddenly find myself with a top alpine set-up after skinning up.

Advantages & disadvantages

+ Reliable, robust system

+ Best downhill performance

+ Different sole choices (ISO and WTR, GripWalk now also available)

+ 2nd ski set available to equip several skis with the base plates. (In combination with inserts mounted in the skis on the rear jaws, this creates a removable binding that can be used on several skis)

+ Fitting of commercially available crampons

+ 2-fold climbing aid and completely flat setting

+ Assembly possible at home (some skill required)

+ Drilling pattern of the P18

- Total weight compared to other touring bindings and unusual weight distribution due to the rear jaw on the ascent

- Ski boots with inserts necessary

- The loose binding front jaws can theoretically be lost or forgotten

- Additional acquisition costs for alpine binding

- 2 additional drill holes

Details

Price whole system: 675$ (with P18)

Price without P18: 345$

2nd ski set: 100$

Spare parts also available separately.

Weight (according to the website): 2000 grams "touring weight" per pair (without the P18 toe pieces, which are in the backpack)

Here is the link to the CAST website with further information.

PowderGuide was provided with 2 kits free of charge by the manufacturer. You can find out how we test them in our test statement.

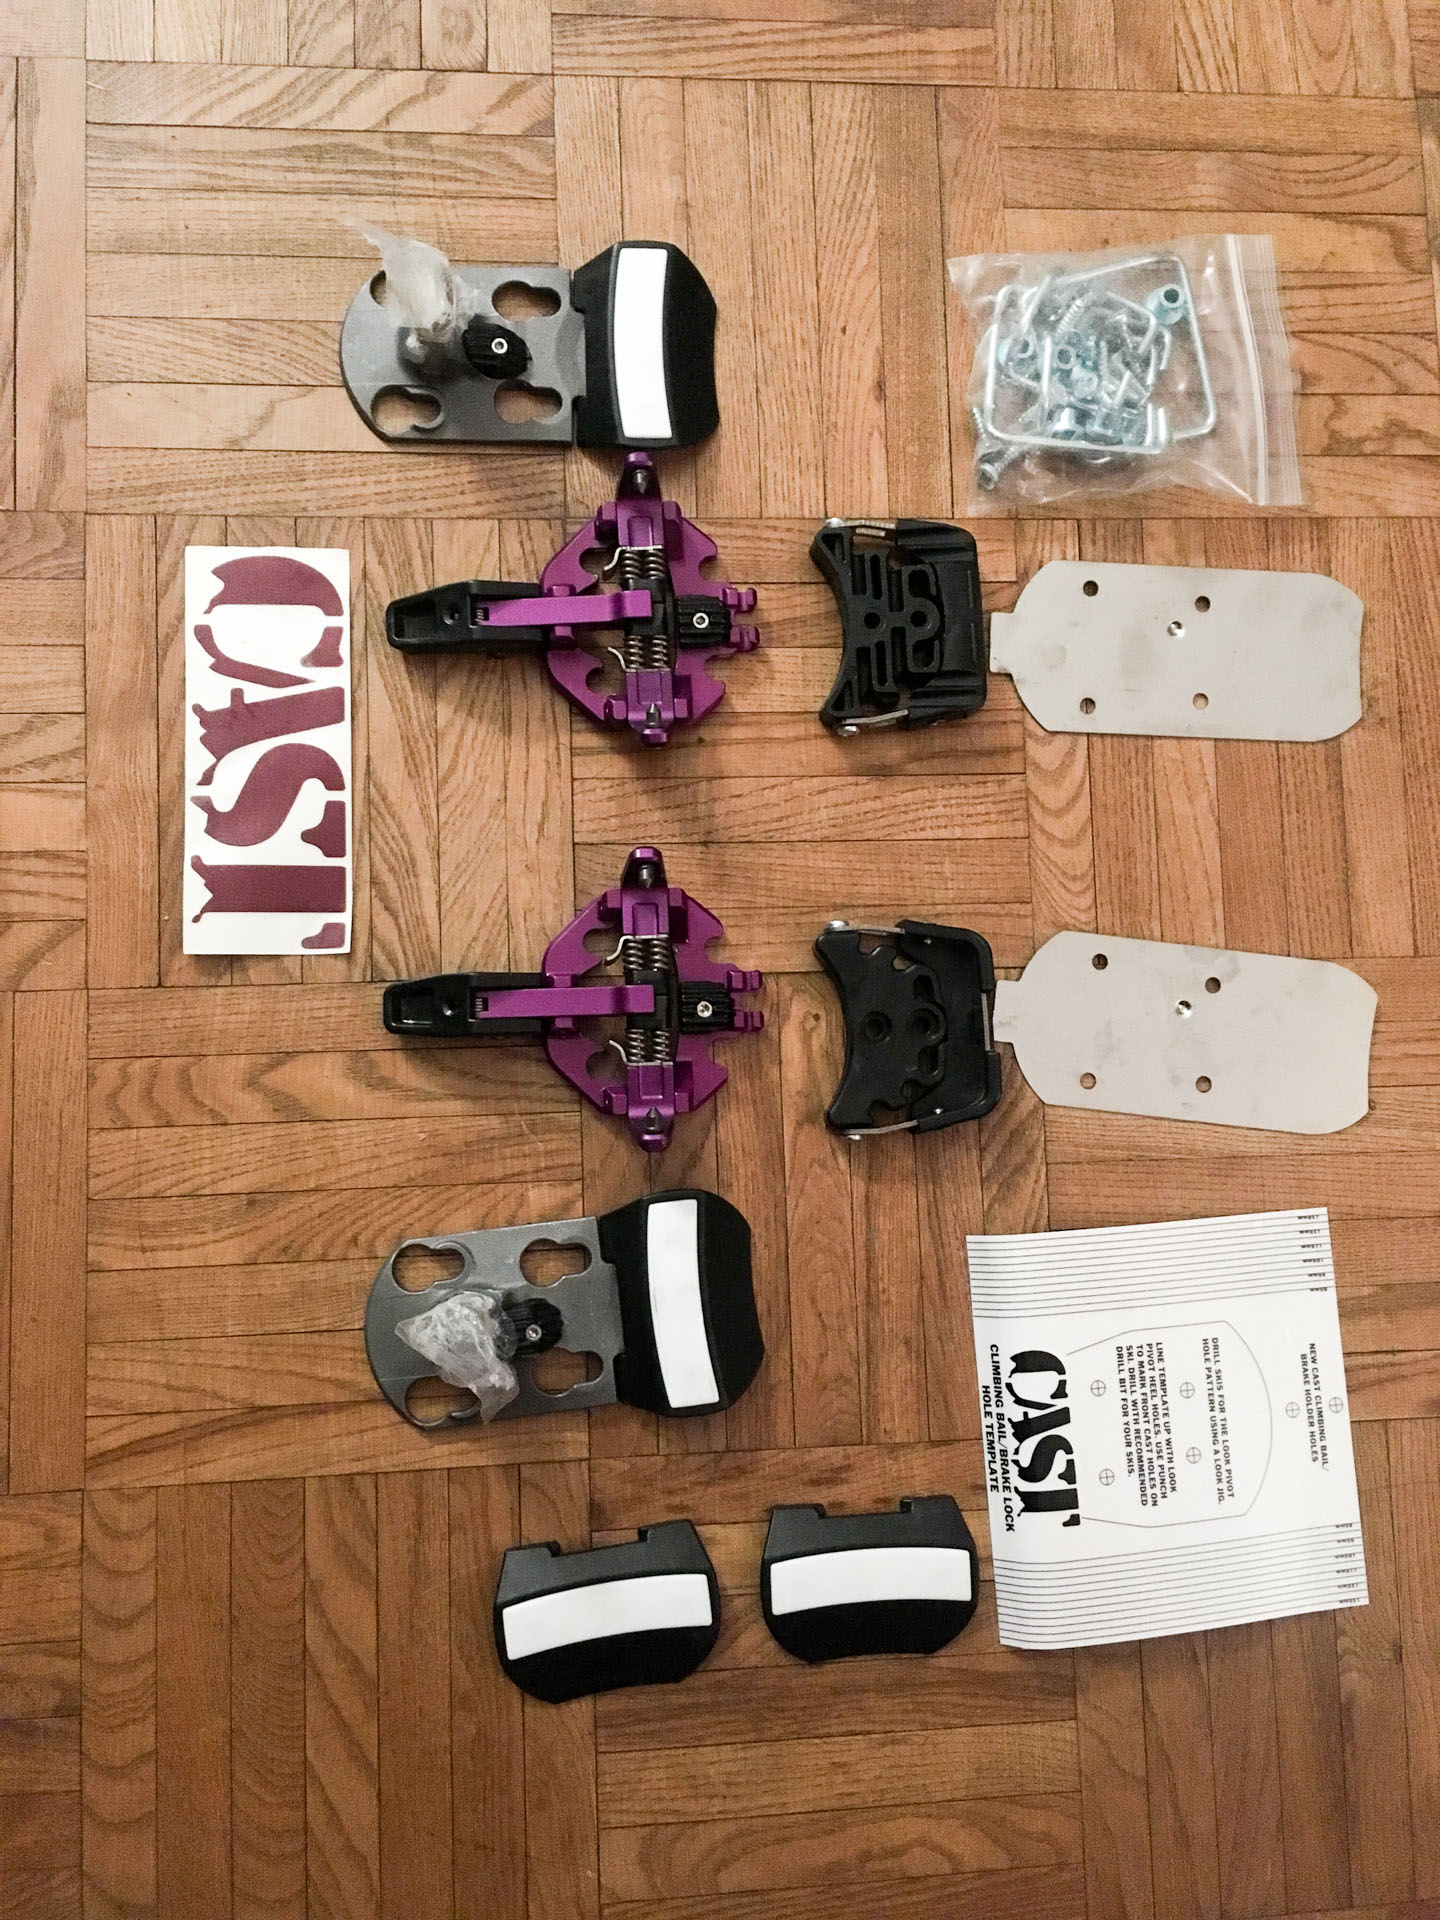
Photo gallery

ℹ️PowderGuide.com is nonprofit-making, so we are glad about any support. If you like to improve our DeepL translation backend, feel free to write an email to the editors with your suggestions for better understandings. Thanks a lot in advance!

Show original (German) Show original (French)

Related articles

Comments

gear reviews
presented by